Paver Sealing in Sarasota for Travertine, Marble, Shell Lock, and Concrete Pavers

UBA cleans and seals every common paver type in Sarasota and Manatee using Stain Guard and Slip Guard chemistry. We assess the surface first, recommend the right sealer for your finish, and stand behind the work in writing.

Request a Paver Assessment
5.0 · 400+ Google Reviews
5.0 Rating / 400+ Google Reviews
Stain Guard + Slip Guard Sealers
15 Years Roofing + Hardscape Expertise
Sarasota + Manatee Counties Served

The Paver Types UBA Handles Across Sarasota and Manatee Counties

Paver sealing in Florida is not one job. The right chemistry, surface prep, and finish for travertine is different from the right approach for concrete brick pavers, and both are different from shell lock or natural marble. Here are the surfaces we handle most often, and what is specific to each.

Four Sarasota paver types handled by UBA: travertine pool deck, marble entry courtyard, shell lock walkway, and concrete brick driveway

Travertine

Travertine is the dominant pool deck material in upper-tier Sarasota neighborhoods. It is a natural stone, porous, and prone to picking up oil, sunscreen, and organic staining. Untreated travertine fades visibly within 18 to 24 months under Florida sun and salt exposure. Travertine sealers fall into two categories: penetrating (which protects from within without changing the surface look) and topical (which adds a finish layer and slightly enriches color). UBA carries both and recommends based on what the homeowner wants the surface to look like long-term. The Marble Institute of America documents care standards for travertine that align with the penetrating-sealer approach for most pool-deck installations.

Marble Pavers

Marble is less common but shows up on high-end Sarasota properties, particularly on shaded courtyards and entryways. Marble's calcium carbonate composition makes it vulnerable to acidic damage (pool chemicals, citrus from fallen oranges, even certain plant fertilizers). The sealer choice for marble is almost always penetrating because topical sealers can interact poorly with marble's natural patina. We test a small area before committing to a full application on any marble surface that has been previously sealed or treated.

Shell Lock

Shell lock is a regional choice in Sarasota and along the Gulf Coast. It is a permeable paver made from crushed shell and concrete binder, designed to allow water infiltration and reduce stormwater runoff. Shell lock surfaces look great new but quickly stain from biological growth and lose their permeability when joint material clogs. Sealing shell lock is a balancing act: the homeowner usually wants the color and stain protection, but over-sealing kills the permeability the product was installed for. We discuss this trade-off honestly at the assessment. Sometimes the right answer is a deep clean and a partial seal on the visible faces while leaving the joints unsealed.

Concrete Brick Pavers

The most common driveway and walkway material in Sarasota's gated communities. Concrete pavers come in a wide range of finishes (smooth, tumbled, antique) and colors. They are durable, but they show wear in the form of efflorescence (white mineral bloom), color fade from UV, and joint sand loss. Concrete pavers are the surface where the polymeric sand question almost always comes up. We have a clear position on that, and we explain it under the dedicated section below.

Mixed Hardscape Installations

Many Sarasota homes have multiple paver types on a single property: travertine pool deck, concrete brick driveway, shell lock walkway, marble entry. We handle the mixed property as a single coordinated visit, calibrating chemistry and sealer choice surface by surface, instead of trying to apply one product everywhere.

What Sealed Pavers Look Like Compared to Unsealed

Before and after comparison of a Sarasota pool deck: left shows dull stained pavers, right shows the same surface after UBA cleaning and sealing
Before and after of a Sarasota brick paver driveway: left side faded and weathered, right side restored with vibrant color after UBA sealing

What Sarasota Sun, Salt, and Rain Do to an Unsealed Paver Surface

Florida is one of the harshest paver environments in the United States. The combination of UV exposure, salt air, torrential summer rain, and constant biological growth pressure means an unsealed paver surface starts deteriorating from the moment it is installed. Here is what that deterioration actually looks like.

Failure 1

UV Fade and Color Loss

Direct sun bleaches paver color within 12 to 24 months on most installations. Travertine loses its warm tone and goes chalky. Concrete pavers lose their depth of color and look washed out, particularly red and earth-tone finishes. Color fade is rarely reversible without recoloring or a topical sealer with color enhancement. Sealing earlier, before significant fade, locks in the original color.

Failure 2

Salt Air Corrosion and Efflorescence

Sarasota's proximity to the Gulf means salt air reaches every property in the region, even properties miles inland. Salt pulls moisture into porous paver surfaces, where it carries dissolved minerals to the surface as the water evaporates. The result is efflorescence: a white, chalky deposit that ruins the look of any paver color and is difficult to remove once it sets. Sealed pavers do not have the moisture pathway efflorescence needs.

Failure 3

Joint Sand Erosion and Paver Shift

Florida's summer rain regularly delivers two-plus inches in an hour. Unsealed paver joints lose sand to that runoff, which destabilizes individual pavers. Pavers shift, edges chip, and the entire installation starts looking uneven. Re-sanding is part of the prep work for any sealing job we do, and a properly sealed surface holds its joint sand for years.

Failure 4

Biological Growth and Black Streaking

The same Gloeocapsa magma that streaks tile roofs (and the moss and lichen that flourish in Sarasota's humidity) take hold in paver porosity. Black streaking on concrete pavers and dark mottling on travertine are biological growth issues. Sealed paver surfaces are not a food source for these organisms, and growth has nothing to anchor to. Cleaning resets the surface. Sealing keeps it reset.

Failure 5

Slip Hazard When Algae Coats Wet Pavers

Algae growth on a wet pool deck or walkway is not just an appearance issue. It is a slip hazard. The Slip Guard product we use is specifically formulated to reduce surface slickness when wet, which matters most on pool decks, lanais, and entryways where wet feet are a daily reality. We recommend Slip Guard for any sealed surface that gets routinely wet.

How UBA Cleans and Seals Pavers, Step by Step

Paver sealing done correctly is a multi-day process. Cleaning, drying, surface prep, sealer application, and cure all need to happen in sequence with the right conditions in between. Here is what each phase involves and why every step is there.

Step 1

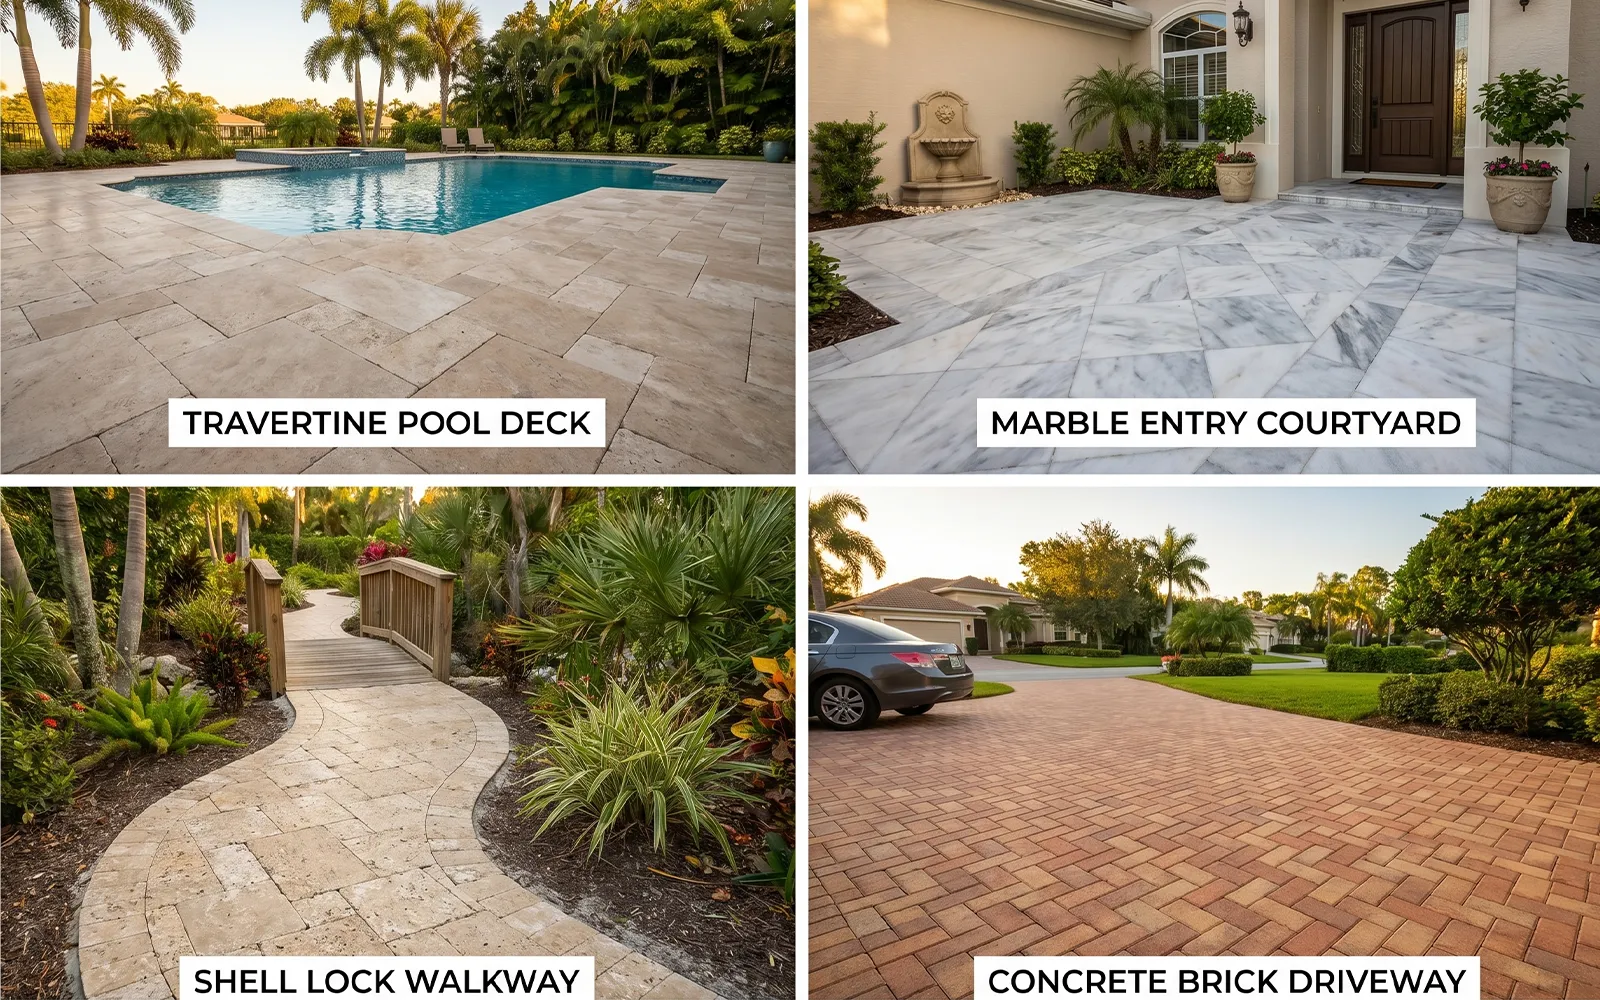
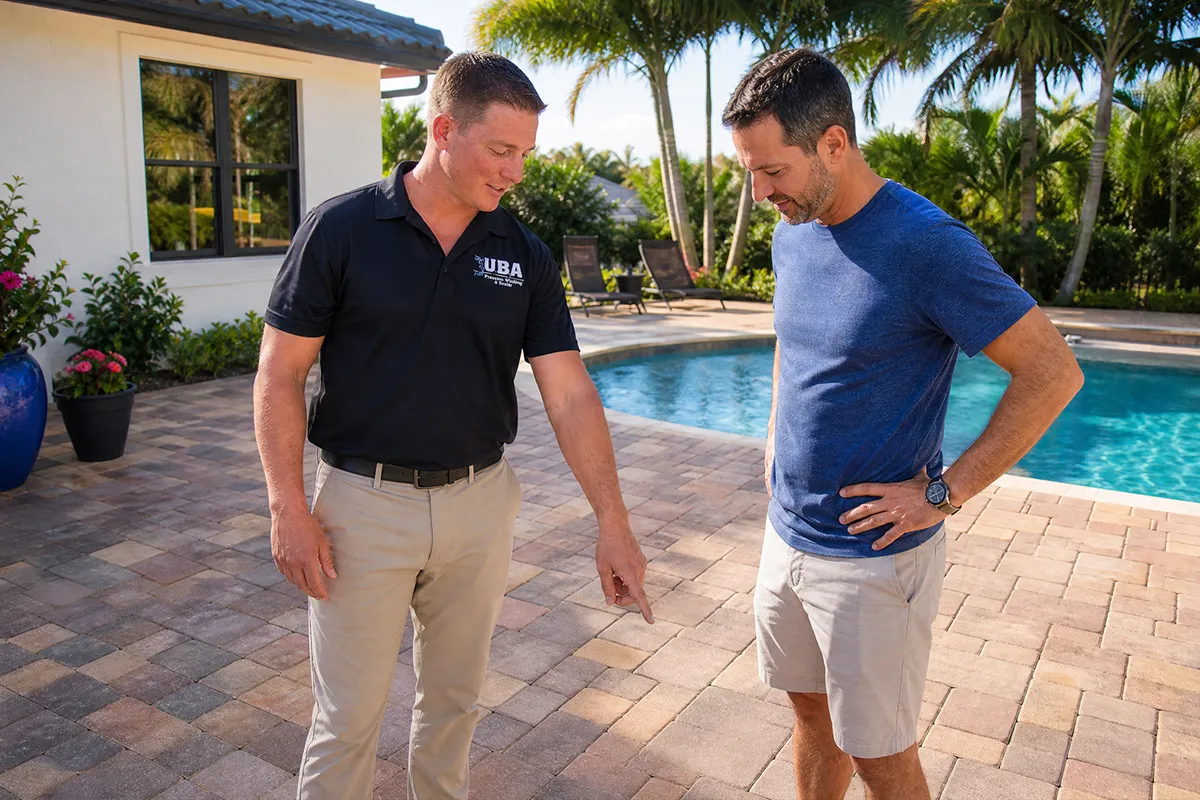
Site Assessment and Sealer Selection

Every paver job starts with a site visit. We walk the surface, identify the paver type or types, document the current condition, check for prior sealer applications (which complicate the work), and discuss what the homeowner wants the finish to look like. Some homeowners want enhanced color and a slight wet-look sheen. Others want the surface to look untreated. The sealer selection (water-based vs solvent-based, penetrating vs topical, Stain Guard alone or Stain Guard plus Slip Guard) follows from that conversation. We do not pick a sealer before we have walked the surface.

Step 2

Pressure Cleaning and Surface Prep

Pavers cannot be sealed over residual growth, oil staining, or efflorescence. The cleaning phase removes all of it. Concrete pavers tolerate moderate pressure (1,500 to 2,500 PSI) with appropriate tip selection. Travertine and marble are cleaned with much lower pressure and chemical assist to avoid surface damage. Joint sand that is lost during cleaning is replaced with fresh polymeric-free joint sand before the surface is allowed to dry. (See Section 6 on polymeric sand.) Oil and rust stains are spot-treated with appropriate removers before the general clean.

Step 3

Drying Time

Pavers must be fully dry before sealer application. In Sarasota's humidity, this means 24 to 48 hours of dry weather between cleaning and sealing. We do not schedule sealing days when the 48-hour forecast shows more than 30 percent precipitation probability. If a weather delay occurs, the application is rescheduled without cost or inconvenience. Sealing a damp paver surface traps moisture under the coating, which causes white blushing and premature failure. We do not take that shortcut.

Step 4

Stain Guard Sealer Application

Stain Guard is the primary penetrating sealer we use across most paver types. It bonds with the paver surface, blocks the porosity that holds stains and biological growth, and resists UV degradation. Application is roller, brush, or low-pressure spray depending on surface and access. We apply two coats with cure time between them on most concrete paver installations. Coverage is measured (not estimated) and documented on the work order.

Step 5

Slip Guard Application Where Recommended

For pool decks, lanais, walkways, and any surface that gets wet routinely, we add Slip Guard as a top layer over Stain Guard. Slip Guard introduces a micro-texture that reduces surface slickness when wet. It does not change the look of the underlying sealer or paver color. The slip-resistance benefit is significant, particularly on travertine pool decks where the natural surface gets dangerously slick under water.

Step 6

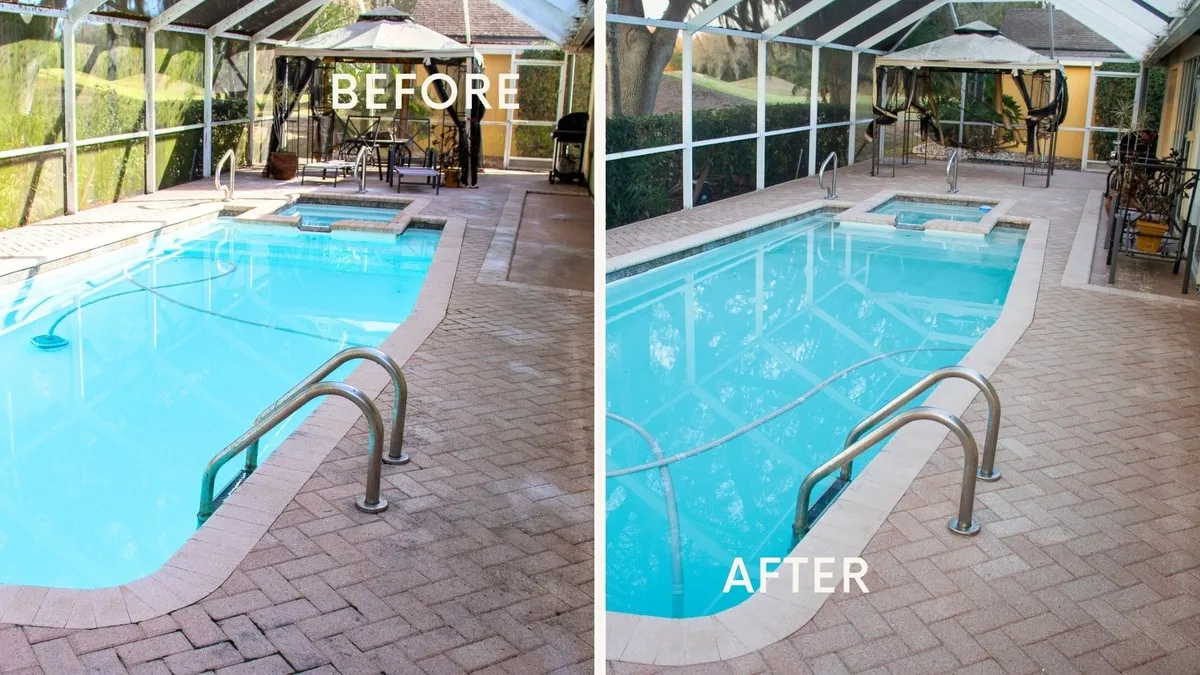
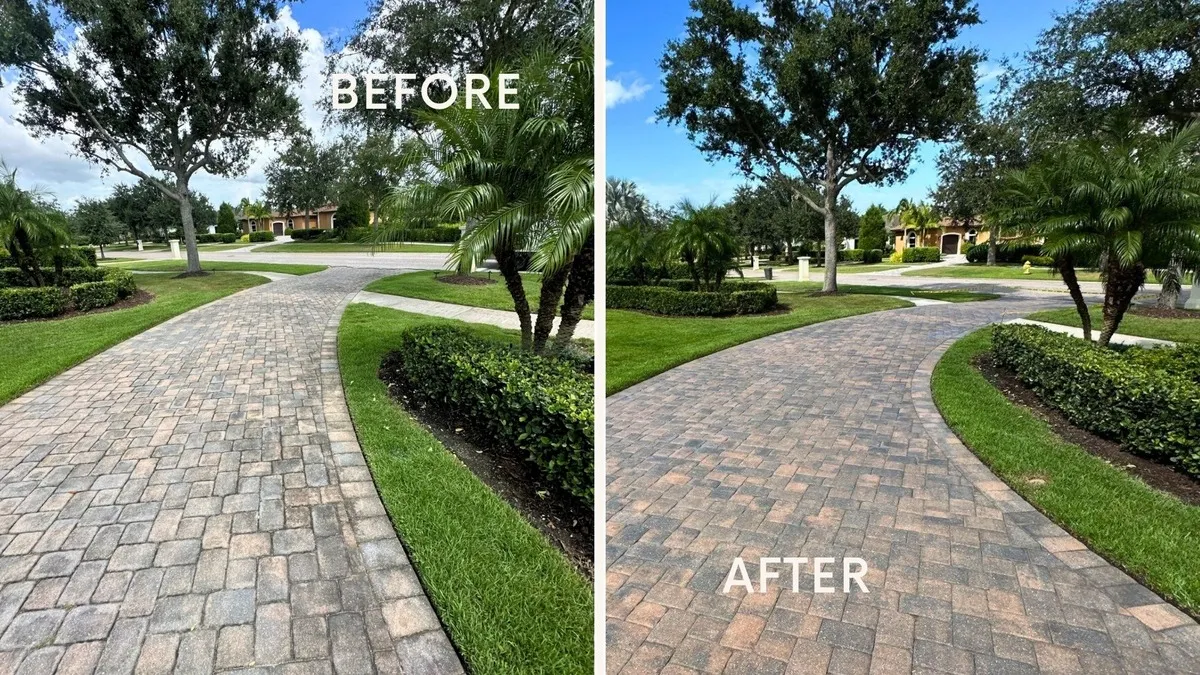
Cure and Walkthrough

Cure time is 24 to 72 hours depending on sealer type and ambient conditions. We mark the property and provide written instructions for when the surface can be walked on, when furniture can return, and when full water exposure (pool use, sprinkler systems) can resume. The crew lead walks the property with the homeowner (or sends documentation if remote) at the completion of the job. Every paver job is documented with before and after photos.

Why UBA Recommends Against Polymeric Sand on Most Sarasota Paver Installations

This is the most common question we field at the paver assessment, and our position is firm: polymeric sand causes more problems than it solves on the majority of Sarasota paver installations. Here is why.

UBA technician discussing paver sealing options with a Sarasota homeowner next to a sealed travertine pool deck
Point 1

What Polymeric Sand Is and Why It Got Popular

Polymeric sand is joint sand mixed with binding polymers. When activated with water, the binders harden and the sand becomes a semi-rigid joint material. It was marketed as a way to stop joint sand erosion and weed growth. On a properly installed, regularly maintained paver surface in a moderate climate, it can work. Florida is not a moderate climate.

Point 2

Why It Fails in Sarasota's Climate

Polymeric sand depends on a clean, dry installation and clean, dry maintenance. In Sarasota, you get neither reliably. Summer humidity prevents the sand from curing fully if it is installed in the wrong window. Rain within the first 24 hours of activation washes the polymers out before they bond. And here is the deeper issue: once polymeric sand has been installed and has partially failed (which it almost always does, in our experience), removing it is significantly harder than removing regular joint sand. The polymer residue contaminates the joint. New joint sand will not bond properly. Sealer will not penetrate the joint correctly. The homeowner is locked into a maintenance situation that is worse than if regular sand had been used from the start.

Point 3

Joint Sand Hazing on the Paver Surface

Polymeric sand activates with water. When it activates, the binders can haze onto the adjacent paver surface, leaving a film that is hard to remove and visible from a normal viewing distance. We have seen this on jobs where the original installer did not protect the paver face adequately during activation. The fix is acid washing the paver surface, which carries its own risks for travertine, marble, and color-treated concrete pavers.

Point 4

What UBA Uses Instead

We use traditional polymer-free joint sand. The sand stays in the joint with the help of the surface sealer (Stain Guard), which penetrates the upper portion of the joint and binds the sand mechanically. Re-sanding is part of the sealing prep, and joint sand replenishment is a quick add-on every 3 to 5 years if needed. This approach is simpler, cheaper to maintain, and does not lock the homeowner into a failed-polymeric situation. The Interlocking Concrete Pavement Institute documents joint sand and sealer interactions that align with our position on this.

Point 5

When Polymeric Sand Is the Right Call

We will not pretend the answer is universal. On a few specific installations (high-traffic commercial pavers with predictable maintenance schedules, certain pedestrian-only installations in covered areas) polymeric sand makes sense. If your installation is one of those, we will tell you. We are not anti-polymeric on principle. We are anti-polymeric on the Sarasota residential paver installations we see most often.

Water-Based vs Solvent-Based Sealers: What the Choice Actually Affects

This is the second most common question we field. The honest answer is that the right choice depends on the paver type, the homeowner's finish preference, and the conditions during application. Here is how each sealer category performs on Sarasota installations.

Water-Based Sealers

Water-based sealers are easier to apply, lower-odor, faster to clean up, and easier to recoat. They provide good UV and stain protection on most concrete paver finishes. The downside is they typically produce a more natural look (less wet-look sheen) and have a slightly shorter recoat interval than solvent-based products under heavy use. For most Sarasota residential pavers, particularly driveways and walkways where homeowners want a clean but natural finish, water-based sealers are our default recommendation.

Solvent-Based Sealers

Solvent-based sealers produce a deeper color enhancement, a wet-look sheen (when that is what the homeowner wants), and a stronger surface bond. They are the right call for pavers that have already lost significant color and need to be revived visually. The trade-off is application is more sensitive to conditions (no humidity above a certain threshold, no temperature below a certain floor), the odor during application is significant, and the recoat process requires more aggressive prep. We use solvent-based sealers where the result calls for them, not as a default.

How UBA Picks Between Them on Your Job

We pick based on the surface, the finish you want, and the conditions we will be working in. The choice is made at the site assessment, in conversation with the homeowner, after we have walked the surface and discussed expectations. We do not pre-load the quote with a specific sealer before we have seen the job. Anyone who quotes a paver sealing job over the phone without an in-person look is guessing.

Realistic Lifespan: What a Sealed Paver Surface Looks Like at Year 1, 3, and 5

The marketing on paver sealers often quotes lifespan in best-case conditions that do not apply to Florida. Here is the honest cadence we see across hundreds of Sarasota installations.

1Year

Sealer Performing as Designed

The first 12 months after sealing are when the surface looks the best it will look. Color is enhanced, water beads visibly on the surface, joint sand is locked in, and biological growth has nothing to anchor to. Maintenance during this period is rinse-and-go. Properly applied sealer at year 1 is hard to distinguish from a brand new installation.

3Year

The Decision Point

At year 3, most sealed surfaces show modest wear in high-traffic areas (driveway tire paths, walkway centerlines). Color is still good. Joint sand is still in place. Water beading may have reduced in some sections. This is the inspection point where we recommend a maintenance recoat on most surfaces. The maintenance recoat is a fraction of the original sealing cost and extends the protection envelope for another 2 to 3 years. Homeowners who skip the year 3 recoat usually call us back at year 5 needing a full reseal that costs significantly more than the maintenance would have.

5Year

Full Reseal Range

At year 5, most pavers need a full clean and reseal. The original sealer has reached the end of its functional life. Color may be fading again. Joint sand may need replenishment. The job at year 5 is essentially a fresh sealing job: clean, re-sand, dry, apply. Homeowners who did the year 3 maintenance recoat can typically extend to year 6 or 7 before a full reseal.

3–5Honest Window

Why 3 to 5 Years Is the Realistic Window

Outside of Florida, paver sealers can sometimes deliver 7 to 10 years between full reseals. Florida's UV exposure, humidity, salt air, and biological growth pressure compress that window. The companies that quote “10-year paver sealer” timelines for Sarasota installations are either using language that does not match the reality their customers experience, or they are quoting a maintenance recoat product as the full sealing solution. Three to five years is the honest range. We tell customers that at the assessment.

Why Most DIY and Big-Box Paver Sealing Jobs Fail Within 12 Months

We get calls from homeowners who tried to seal their own pavers after watching a few videos, then called us when the job started failing. The patterns are consistent. Here is what goes wrong, and what changes when a professional does the same work.

The DIY and Big-Box Sealer Way

Buy a 5-gallon pail of sealer from a big-box store, rent or buy a pump sprayer, watch a few tutorial videos, pick a Saturday, and start spraying. The work usually goes like this:

  • The cleaning step is rushed or skipped, so sealer goes on top of residual algae, efflorescence, and trapped moisture
  • The application is uneven (heavy in some sections, thin in others), which shows up as patchy color enhancement within weeks
  • The wrong sealer is selected for the paver type (solvent-based on travertine, topical sealer on shell lock, etc.) and creates problems that take a professional to remediate
  • The joint sand step is skipped, so the sealer locks in nothing and joint loss continues
  • The weather window is mistimed, so the sealer fails to cure properly and goes white-hazy within months
  • What homeowners can't see: the actual long-term performance of the surface, which is what they were paying the sealer to protect
Outcome: Looks clean on the day-of. Damage compounds quietly.

The UBA Way

We walk the surface before quoting. We pick the right sealer for the paver type and the homeowner's expectations. We clean to bare surface, re-sand joints, and time application against the weather window. The application is even and measured. We document the work and stand behind it.

  • Sealer choice matches the paver type and finish goal
  • Cleaning brings the surface to a true bare state before sealer application
  • Joint sand is replenished with polymer-free product before sealing
  • Application is measured, even, and documented with before-and-after photos
  • Weather windows are checked against a 48-hour forecast threshold
  • We provide a written satisfaction guarantee that holds us to the result
Outcome: 3 to 5 year hold. Written guarantee backed.

We Deliver a Surface That Holds for Years, Not Months

The price difference between a DIY sealing attempt and a professional UBA job looks bigger on paper than it does in practice. Most DIY paver sealing jobs fail within 12 months, which means the homeowner pays twice: once for the materials and time they invested, once for the professional remediation that follows. The total cost of getting it right the first time is usually lower than the cost of doing it twice. The Interlocking Concrete Pavement Institute documents installation and sealing best practices that confirm what we see in the field.

Why We Do Not Post Paver Sealing Prices Online

Every Paver Installation Is Different

Paver sealing cost is driven by paver type (travertine and marble are more labor-intensive than concrete), square footage, current condition (heavily stained or efflorescent surfaces require additional prep), joint sand replacement needs, sealer choice, whether Slip Guard is added, and accessibility. A 400-square-foot concrete paver walkway and a 2,000-square-foot travertine pool deck with shell lock walkway extensions are not the same job, and a single posted price would mislead either homeowner. We give you a real number after a real assessment of your specific installation. That number is what you pay. No mid-job upsell. No discovered conditions added to the invoice after the fact.

Common Questions About Paver Sealing in Sarasota

These are the questions we field most often at the site assessment. For broader exterior maintenance questions, our roof cleaning and HydroLock pages go deeper on the roof side of the conversation.

How often should pavers be sealed in Sarasota?+

Plan on a full reseal every 3 to 5 years, with a lighter maintenance recoat at year 3 to extend the protection envelope. Florida's UV, humidity, and biological growth pressure compress sealer lifespans compared to drier climates. We tell customers honestly at the assessment what the realistic re-seal cadence looks like for their specific surface.

Will paver sealing make my surface slippery?+

Not when Slip Guard is part of the application. Stain Guard alone can produce a slightly slicker surface when wet, particularly on travertine pool decks. That is why we recommend Slip Guard as a top layer on any pool deck, lanai, or walkway that gets wet routinely. Slip Guard introduces a micro-texture that improves traction without changing the visual finish.

Why does UBA recommend against polymeric sand?+

Polymeric sand requires a clean, dry installation and clean, dry maintenance, neither of which is reliable in Sarasota's climate. Failed polymeric sand is significantly harder to remove than regular joint sand, and the residue contaminates the joint so new sand and sealer do not bond properly. We use traditional polymer-free joint sand and rely on the sealer to bind it mechanically. Section 6 of this page covers the reasoning in detail.

Can you seal pavers that have already been sealed by someone else?+

In most cases yes, but the prior sealer has to be assessed first. If the previous application was the same sealer chemistry and is intact, a maintenance recoat is straightforward. If the previous sealer is a different chemistry, has failed, or has white-hazed, the prior sealer needs to be removed before we can apply a fresh coat. Removing a failed topical sealer is significantly more labor than a fresh sealing job. We will tell you exactly what we are looking at after the site assessment.

Will paver sealing change the look of my pavers?+

Depends on the sealer choice. Penetrating sealers like Stain Guard preserve the natural look of the paver while protecting from within. Topical sealers and solvent-based sealers can enhance color and add a slight wet-look sheen. Some homeowners want enhancement, others want the surface to look untreated. We pick based on what you want the finish to look like, and we do a small test area before committing to a full application if the result is hard to predict on your specific paver.

Is it worth sealing pavers, or is the cost just a maintenance treadmill?+

It depends on what you are trying to protect. For travertine and natural stone pavers, sealing is not optional. The surface degrades quickly without it and replacement is expensive. For concrete pavers in a low-traffic shaded area, the case is less urgent and a homeowner can reasonably defer. For pool decks, driveways, and any high-visibility hardscape in direct sun, sealing pays for itself by preserving the original installation. We will tell you honestly which category your installation is in.

Do you offer paver sealing as part of a full exterior package?+

Yes. Many of our customers schedule paver sealing alongside roof soft washing, HydroLock application, or house washing. Bundling reduces the per-service cost and consolidates the calendar disruption. We will quote the work either as a standalone paver job or as part of a combined visit, depending on what works for your schedule.

Are you licensed and insured?+

Yes. UBA is a licensed contractor in Florida and carries full liability and workers compensation insurance. Insurance certificates are available on request. For Florida homeowners hiring exterior service crews, verifying licensing and insurance through the Florida Department of Business and Professional Regulation is always recommended.

Schedule a Sarasota Paver Sealing Assessment

How the Assessment Works

Call (941) 320‑6172 or use the form below. Tell us your paver type (if you know it), approximate square footage, the current condition (any visible staining, efflorescence, color fade), and what you want the finish to look like when we are done. A few photos help us scope the job accurately. We will be in touch within one business day to schedule an in-person assessment.

What You Get From a UBA Paver Sealing Visit

  • Site walkthrough and sealer selection conversation before any work begins
  • Pressure cleaning calibrated to the paver type and condition
  • Polymer-free joint sand replenishment as part of the prep
  • Stain Guard sealer application with measured, documented coverage
  • Slip Guard top coat on pool decks, lanais, and walkways
  • Before and after photos and a completion walkthrough with the crew lead
  • A written satisfaction guarantee on the work
  • Honest answers about whether your installation needs sealing or not